Has your car ever been at the receiving end of a former partner’s wrath? If yes, then you know the pains of repairing the damage a key and an angry ex can cause. If you are experiencing it for the first time, we offer a guide on how to fix a keyed car. Bear in mind that this is no task for the impatient but it sure beats paying for the repair.
Things You Will Need to Fix a Keyed Car
Before you learn how to fix a keyed car, make sure you have the following:
- Paint – Make sure the paint you choose matches your car’s original paint as much as possible. For a more natural look, we strongly recommend buying paint in spray cans. There are also touch-up pens as well as other styles of applicators. Usually, this boils down to personal preference.
- A brush – Ensure that the brush has a fine tip and is suitable for small touch-ups you will need to do.
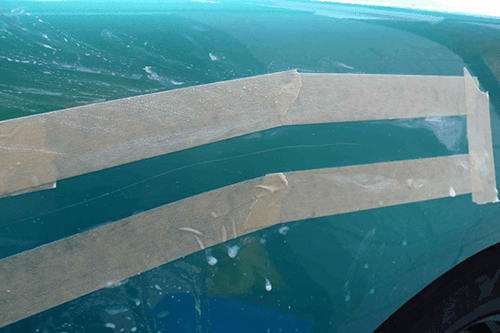
- Masking tape – Needless to say, you need to choose tape that will not cause any further damage to the original paint.
- Sand block and grain paper - Depending on the size and the depth of the scratch, you might need several different types of grain paper (1500 – 3000). We suggest choosing at least three types with different coarseness.
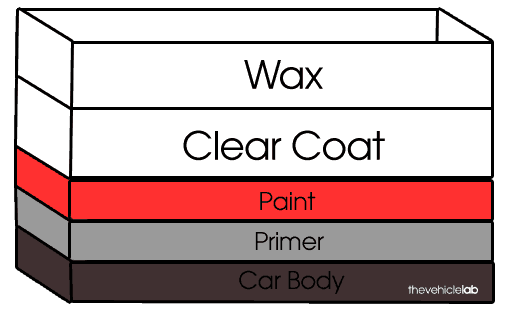
- Primer – You might not need to use it, but in case you take it too far with the sanding, it is a good idea to have it around. The touch-up paint will apply better, and you will minimize the risk of visible difference between the shades.
- Clear Coat – Again, buy it in a spray can, as it will be easier to apply.
- Polish or Wax – Choose this one based on your personal preference.
- Cloth – We suggest using a clean, or new, microfiber cloth.
How to Fix Keyed Car Scratches
1. Washing the Car
First and foremost, wash the affected area completely. Make sure you get rid of any dirt. Doing so will also enable you to see the actual extent of the damage you need to fix.
2. Drying the Car
Once you’ve washed the car, dry it thoroughly using a clean microfiber cloth. Again, pay special attention to the damaged area. Leaving it moist will hinder the application of paint.
3. Applying Masking Tape
In order to protect the areas surrounding the scratch, apply masking tape to outline it. That will ensure that you do not cause any further damage to the original paint while sanding. Moreover, it will protect the rest of your car when you apply multiple layers of new paint. Use old newspapers to protect a wider area if you want to make sure you don’t get new paint anywhere else on your car.
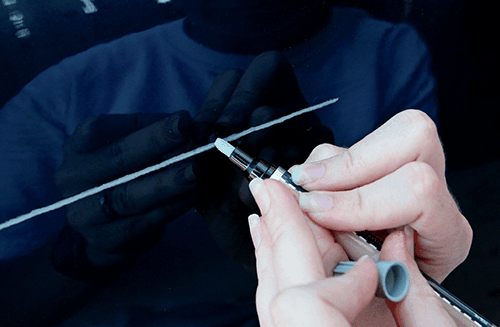
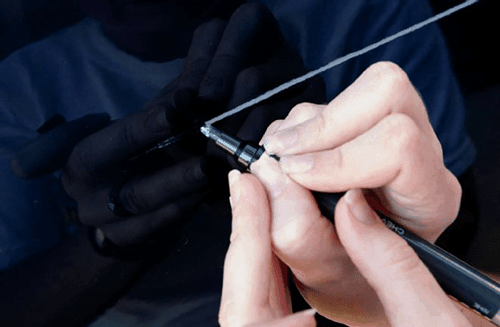
4. The Sanding
Now, this step might take a bit longer, depending on the depth of the scratch. To determine if the scratch is a clear coat scratch (surface level), spray some soapy water on the scratch, wipe dry with a microfiber cloth. If the scratch “disappears” and then reappears, it is likely a clear coat scratch. If you spray a deep scratch with the soapy water it will not disappear because the water won’t temporarily fill that void. You will likely be able to see the layers below.
Different companies use varying amounts of clear coat. With your 2000-3000 grit sandpaper, you want to continue wet sanding a clear coat scratch until the scratch is barely visible. While sanding, make sure that you do not apply too much pressure to the dinged area. Even out the scratch by applying gentle pressure to it.
Do not try to rush this step – take as much time as you need with it. Moreover, give the area enough time to cool down before moving on to the next step. Also, don’t be concerned if the end result is “cloudy.” This will come out when you wax/polish.
If your cut was down to the primer. Start with your 1500 grit sandpaper to sand the affected area. Wet sand perpendicular to the scratch. Once this is even, wipe clean with your cloth. Grab 3000 grit sandpaper and continue to sand the area with overlapping strokes both up and down and side to side.
The goal is to make the scratch an even surface and to have things blend together.
Note: If your scratch was a clear coat scratch, you can move onto the polish step.
5. Applying the Primer
If your scratch was deeper than the clear coat, then continue on with these steps.
When giving you the list of supplies for this job, we said that you might need a primer. Apply the primer in at least two thin coats, giving enough time for each coat to dry completely.
6. Applying the Paint
After the primer is dry, you can start applying the touch-up paint. There a couple of options here for the application. We opted for pens and dropper sized bottles with brush included.
When using touch-up paint, it’s important to get the exact color of your car. There are thousands of shades of blues out there. Often you can find this information online in order to find the OEM paint for an exact match.

You can also use spray paint.
The best way to evenly apply spray paint is by holding the spray can 6 to 8 inches away from the damaged surface. Administer several thin coats using a steady side-to-side motion. Furthermore, make sure you release the can tip at the end of each pass. Use the brush to even put any possible paint trickles. Again, give each coat enough time to dry before continuing.
Repeat the same set of movements until you are sure that the level of new paint reaches the level of old paint (i.e., that there is no difference in height between the two).
7. Applying the Clear Coat
After you applied all the necessary coats of touch up paint, it is time to add some extra protection to it. You will use the clear coat for that. The same rules with the paint apply here. Once you are satisfied with the effect, remove the masking tape.
8. Waxing

Grab your polish and microfiber cloth and buff the affected area till the cloudy area is gone. After, wax the affected area and allow to dry and then wipe again with your microfiber cloth.
